How To Vent A Range Hood On An Interior Wall

If you’re looking to install a range hood on an interior wall but aren’t sure how to properly vent it, you’re in the right place. Venting a range hood on an interior wall may seem challenging, but with the right steps, it can be a straightforward process. In this article, we will guide you through the necessary steps to successfully vent a range hood on an interior wall, ensuring optimal functionality and a well-ventilated kitchen space. So let’s get started on transforming your cooking area into a more pleasant and odor-free environment.

Table of Contents

1. Determine the Location

1.1 Choose the Wall

When considering where to install your range hood, it’s important to choose the right wall. Look for a wall that is close to your stove, as this will ensure efficient ventilation. Ideally, the wall directly behind your stove is the best option.

1.2 Consider the Proximity to the Stove

The proximity of the range hood to the stove is crucial for effective ventilation. Make sure that the wall you choose is close enough to capture the smoke, steam, and odors that are generated while cooking. A range hood that is too far away may not be as effective at removing these irritants from your kitchen.

1.3 Check for Obstacles

Before finalizing the location, it’s important to check for any obstacles that may hinder the installation process. Look for electrical wires, plumbing pipes, or any other obstructions that may be present in the wall. It’s essential to choose a location that allows for a clear and unobstructed path for the vent ducting.

1.4 Evaluate Structural Integrity

Another consideration when choosing the location for your range hood is the structural integrity of the wall. You want to make sure that the wall can support the weight of the range hood and any additional ducting that may be required. If you have any concerns about the wall’s ability to support the weight, it may be necessary to reinforce it before proceeding with the installation.

2. Gather Necessary Tools and Materials

2.1 Range Hood

The first item you’ll need is a range hood. Depending on your preferences and the size of your kitchen, you can choose from a variety of range hoods, including wall-mounted, under-cabinet, or island range hoods. Make sure to select a range hood that is compatible with the interior wall installation.

2.2 Vent Ducting

Vent ducting is essential for directing the airflow from your range hood to the exterior of your home. It is typically made of metal and comes in various sizes. Be sure to choose the appropriate diameter and length of ducting that will connect your range hood to the wall pass-through vent.

2.3 Vent Cap

A vent cap is essential for preventing rain, debris, or pests from entering your ducting and kitchen. It is installed on the exterior wall where the ducting exits. Choose a vent cap that is compatible with the size and style of your ducting.

2.4 Wall Pass-Through Vent

The wall pass-through vent is the point where the ducting exits your interior wall and connects to the vent cap on the exterior. Ensure that you have a wall pass-through vent that matches the diameter of your ducting and is suited for interior wall installations.

2.5 Drill and Bits

You’ll need a drill to create holes for mounting the range hood and the wall pass-through vent. Make sure to have the appropriate drill bits for the type of wall material you are working with, such as wood, drywall, or concrete.

2.6 Saw

A saw will be necessary for cutting the wall opening to accommodate the vent ducting. The type of saw you need will depend on the wall material. For example, a reciprocating saw may be suitable for cutting through drywall, while a circular saw may be necessary for cutting through thicker materials like wood.

2.7 Screwdriver

A screwdriver is essential for securing the range hood to the wall and making any necessary adjustments during the installation process. Make sure you have both a flathead and a Phillips head screwdriver to accommodate different types of screws.

2.8 Tape Measure

Accurate measurements are crucial in ensuring that your range hood and ducting are installed properly. A tape measure will help you determine the correct distances for positioning the range hood, cutting the wall opening, and installing the ducting.

2.9 Metal Nuts and Bolts

Metal nuts and bolts are used to secure the ducting sections together, as well as to attach the ducting to the range hood. Make sure to have a selection of nuts and bolts in various sizes to accommodate your specific installation requirements.

2.10 Duct Tape

Duct tape is useful for providing a secure and airtight connection between ducting sections. It helps to prevent airflow leaks and ensures that your ventilation system functions optimally. Make sure to have enough duct tape to cover the length of your ducting.

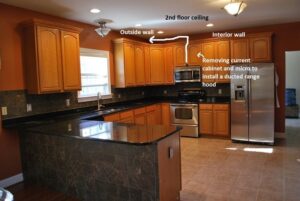
How To Vent A Range Hood On An Interior Wall

This image is property of www.wikihow.com.

3. Plan the Ducting Route

3.1 Determine the Distance

Measure the distance between the range hood and the wall pass-through vent to determine the length of ducting needed. This will help you select the appropriate ducting size and ensure that you have enough material to complete the installation.

3.2 Identify Required Angles

Consider the layout of your kitchen and any existing obstacles when planning the ducting route. Identify any necessary angles or bends that may be required to navigate around cabinets, joists, or other obstructions. Use adjustable elbows or flexible ducting to accommodate these angles.

3.3 Avoid Obstructions

Ensure that your planned ducting route is free from obstructions such as electrical wires, plumbing pipes, or structural elements. It is important to maintain a clear path for the airflow to ensure optimal ventilation efficiency.

3.4 Ensure Proper Slope for Air Flow

To facilitate proper air flow, it is important to ensure that the ducting has a slight downward slope from the range hood to the wall pass-through vent. This slope will help to prevent any condensation or moisture buildup within the ducting.

3.5 Consider Backdraft Prevention

Consider installing a backdraft damper or flap within the ducting to prevent outside air from entering your kitchen when the range hood is not in use. This helps to maintain a comfortable indoor environment and prevent drafts.

4. Position and Install the Range Hood

4.1 Refer to Manufacturer’s Instructions

Refer to the manufacturer’s instructions that came with your range hood for specific guidance on positioning and mounting. Each range hood may have different requirements and specifications, so it’s important to follow the instructions provided.

4.2 Mark Mounting Holes

Use a pencil or marker to mark the mounting hole locations on the interior wall. These marks will serve as a guide when drilling pilot holes for the mounting brackets.

4.3 Drill Pilot Holes

Using a drill with the appropriate drill bit, carefully drill pilot holes at the marked locations. Pilot holes help to prevent the wall from splitting or cracking when the screws are inserted during installation.

4.4 Secure the Range Hood

Align the range hood with the pilot holes and attach it to the wall using screws or bolts provided with the range hood. Make sure to tighten the screws securely, but be careful not to overtighten and damage the range hood or wall.

4.5 Connect Electricity

If your range hood requires electrical connection, follow the manufacturer’s instructions to safely connect the wiring. This may involve connecting wires using wire nuts and securing them with electrical tape. If you are not comfortable with electrical work, it is recommended to hire a professional electrician for this step.

How To Vent A Range Hood On An Interior Wall

This image is property of st.hzcdn.com.

5. Cut the Wall Opening

5.1 Mark the Desired Opening

Using a tape measure, mark the desired dimensions of the wall opening on the interior wall. The opening should match the size and shape of the wall pass-through vent.

5.2 Use a Stud Finder

Before cutting the opening, use a stud finder to locate any studs behind the wall. This will help you avoid cutting through them and ensure that your wall opening is in the correct position.

5.3 Measure and Outline the Opening

Measure the dimensions of your wall pass-through vent and use those measurements to outline the opening on the wall. It’s important to be precise and accurate to ensure a proper fit.

5.4 Cut Out the Opening

Using a saw appropriate for your wall material, carefully cut along the outlined markings to create the wall opening. Take your time and use caution, making straight and clean cuts.

5.5 Check for Wiring or Plumbing

After cutting the opening, inspect the wall cavity for any hidden electrical wiring or plumbing pipes. If you encounter any, it’s crucial to reroute these elements or call a professional plumber or electrician for assistance to ensure safety and compliance with building codes.

6. Install Vent Ducting

6.1 Determine Length of Ducting Needed

Measure the distance between the wall pass-through vent and the range hood to determine the length of ducting required. This will ensure that you have enough material and allow for any necessary adjustments or angles.

6.2 Cut the Ducting

Using a saw or metal shears, carefully cut the ducting to the determined length. Take care to make clean and straight cuts to ensure a proper fit and prevent air leaks.

6.3 Attach Ducting Sections

Connect the ducting sections together, ensuring a secure and airtight fit. Depending on the type of ducting you are using, this may involve crimping the edges or using adjustable clamps to secure the connection.

6.4 Secure with Metal Nuts and Bolts

To ensure a secure connection between the ducting sections, use metal nuts and bolts. Attach the bolts to the pre-drilled holes in the ducting and tighten them securely. This will help prevent any movement or dislodging of the ducting during operation.

6.5 Apply Duct Tape

To provide an additional layer of security and prevent air leaks, use duct tape to seal the connections between the ducting sections. Wrap the tape securely around the joints, ensuring a tight seal.

How To Vent A Range Hood On An Interior Wall

This image is property of homeinspectorsecrets.com.

7. Install Wall Pass-Through Vent

7.1 Position the Vent

Position the wall pass-through vent over the wall opening, aligning it properly. Make sure the vent is centered and level with the opening to ensure a proper fit and optimal airflow.

7.2 Drill Vent Hole

Using a drill with the appropriate drill bit, carefully drill a hole through the wall at the designated location for the vent. This hole will serve as a starting point for cutting the opening in the exterior wall.

7.3 Insert and Secure the Vent

Insert the wall pass-through vent into the wall opening and secure it in place. This may involve using screws, bolts, or other fasteners provided with the vent. Ensure that the vent is tightly secured to the wall to prevent any movement or air leaks.

7.4 Seal Around the Vent

To prevent air leaks and ensure a tight seal between the vent and the exterior wall, apply caulk or weatherproof sealant around the edges of the vent. This will help to maintain the integrity of the installation and prevent any water or air infiltration.

8. Connect the Ducting to the Range Hood

8.1 Align the Ducting

Position the end of the ducting near the range hood, aligning it with the opening on the range hood designated for the connection. Make sure the ducting is centered and straight for a proper fit.

8.2 Apply Metal Nuts and Bolts

Attach the ducting to the range hood using metal nuts and bolts. Insert the bolts through the pre-drilled holes in the range hood and tighten them securely to ensure a tight and secure connection.

8.3 Use Duct Tape for Secure Connections

To provide an additional layer of security and prevent air leaks, use duct tape to wrap around the connection between the ducting and the range hood. Ensure that the tape is tight and covers the entire junction to create an airtight seal.

How To Vent A Range Hood On An Interior Wall

This image is property of www.prolinerangehoods.com.

9. Test and Adjust the Range Hood

9.1 Turn on the Range Hood

After completing the installation, turn on the range hood to test its functionality. Check that the fan and lights are operating properly and that the range hood is drawing air efficiently.

9.2 Check Air Ventilation

Ensure that the range hood is effectively removing smoke, steam, and odors from the kitchen. Stand near the stove and observe the airflow to confirm that it is being directed outward through the ducting and vent cap.

9.3 Adjust Fan Speed and Direction

Most range hoods have adjustable fan speeds and directional options. Experiment with different settings to find the optimal configuration that provides effective ventilation without excessive noise or energy consumption.

9.4 Inspect for Proper Exhaust

Inspect the exterior of your home to confirm that the vent cap is properly expelling the air outside. Check for any signs of backflow or restricted airflow, such as debris or pests entering the vent cap.

10. Patch and Paint the Wall Opening

10.1 Fill any Gaps or Holes

Inspect the wall opening for any gaps, holes, or imperfections. Use spackling compound or wall patching material to fill in these areas. Follow the manufacturer’s instructions for application and drying times.

10.2 Sand the Patched Area

Once the patched areas are dry, use sandpaper or a sanding block to smooth out the surface. Sand in a circular motion to blend the patched area with the surrounding wall.

10.3 Apply Primer and Paint

Apply a coat of primer to the patched areas and allow it to dry completely. Then, apply a matching paint color to the entire wall or touch up only the patched areas, blending it with the existing paint.

By following these comprehensive steps, you can successfully vent your range hood on an interior wall. Proper ventilation is essential for maintaining a clean and healthy kitchen environment, ensuring the removal of smoke, odors, and excess heat while cooking.

How To Vent A Range Hood On An Interior Wall

This image is property of cdn.shopify.com.

Leave a Comment

This site uses Akismet to reduce spam. Learn how your comment data is processed.